
Pokeball Cake (for Beginners)
When it comes to making cakes I am more “enthusiastic dad” than cake expert. Honestly, this would probably be the first proper iced cake I’ve made in 10 years. My baking is mainly limited to banana bread, and maybe a tea cake, pound cake or cheesecake now and then.
I wouldn’t usually write a recipe for something I’d made just once but I know that because this is on my Instagram people will ask for the recipe and I’m not likely to make another cake like this anytime soon so here’s really just a record of what I did if you’re like me and only bake these kind of things once in a blue moon and want to follow along. This isn’t a perfect recipe. It’s just what I did and I was very happy with the result.
I’m not trying to win any awards here. Just to make one Pokemon-obsessed kid’s day on his birthday. And I think I succeeded.
Ingredients
Salted white chocolate mud cakes (makes 2)
350g unsalted butter, chopped
450 g white chocolate
300 g caster sugar
5 g salt
350 ml milk
3 large eggs
2 teaspoons vanilla extract
525 grams plain flour
3 teaspoons baking powder
Golden sugar syrup
¾ cup sugar
½ cup golden syrup
1 cup water
(or just use 1 cup sugar and 1 cup water)
Italian meringue buttercream
6 egg whites
1 ½ cups caster sugar
450g unsalted butter
1 tsp vanilla extract (optional)
Additional ingredients
black fondant icing (small amount)
white fondant icing (small amount)
violet, pink and red gel food colours
Equipment
9-inch non-stick cake tin
cake scraper
offset spatula
Method
- Weigh a large saucepan and make a note of the weight. Place the butter, white chocolate, sugar, salt and milk in the saucepan and heat over medium heat. Stir to dissolve the sugar and melt the chocolate until the mixture because smooth and silky. This can take about 20 minutes for the chocolate to melt fully. Remove from the heat and allow to cool for 10 minutes. Whisk the eggs and vanilla together and whisk them into the melted chocolate mixture. Sieve the flour into the liquid ingredients and beat to combine using a whisk or spatula. It doesn’t matter if there are a few lumps in the batter. Weigh the saucepan again and subtract the empty weight to find the weight of your batter. Place a 9-inch non-stick springform baking tin on the scales and pour in half the batter (You don’t need to grease the tin if it’s non-stick). Bake at 180C for 45 minutes or until a skewer inserted into the centre of the cake comes our clean. Allow to cool in the tin for 5 minutes and then transfer to a rack to cool. Wash the tin and then repeat for the remaining batter.
- When the cakes are just slightly warm to the touch wrap them in cling film and aluminium foil. Leave overnight but do not refrigerate.
- To make golden sugar syrup combine the ingredients in a small saucepan and bring to a simmer, stirring to dissolve the sugar. If needed, trip any very high domes from the cakes and brush all over with the golden sugar syrup.
- To make the buttercream, wipe the bowl of a stand mixer with a little vinegar on a paper towel and fit it with the whisk attachment. Place the egg whites in the bowl, and place the sugar and water in a small saucepan. Bring the sugar to a boil and continue to heat until the sugar reaches 114C (use a candy thermometer to check the temperature) or 110C if you’re using induction. (The difference here is that you want the sugar to reach 121C just as the egg whites form soft peaks. That will be much faster on induction than gas or electric.) Immediately start whisking the eggs in the stand mixer at high speed. Once the sugar reaches 121C pour the sugar into the whisking eggs an a very slow, steady stream. Walk away and do something else for a while, continuing to whisk the eggs in the stand mixer until touching the metal bowl of the mixer feels cool to the touch. This can take 30-40 minutes. While this is happening, cut the butter into 1cm cubes.
- Stop the mixer and change to the paddle attachment. Beat in the butter a cube at a time until almost all the butter has been added.
- Getting white buttercream. After adding the butter you should see that the buttercream has gone from bright white meringue to a yellow colour. To neutralise the yellow you need to add a little violet or purple food gel. Before you’ve used all the butter, take about 1 matchhead sized amount of food gel with a toothpick and smear it onto a piece of butter. Add the butter and you should see the yellow colour neutralised. If it still looks a little too yellow, add a little more violet gel. You can flavour your buttercream at this point if you like, by adding vanilla or other extracts, or you can just leave it plain.
- Take your cake board and press 3 small pieces of fondant into the base. Place the cakeboard onto a cake turntable, or if you don’t have one a metal pizza tray. Smear a little buttercream over the fondant and place once cake on top (dome up, although there really shouldn’t be much of a dome). Make sure it’s centred and spread a cup of buttercream over the top. Place the other cake on top (dome down). Smooth a thin layer of buttercream all over the cakes with an offset spatula and cake scraper, smoothing the top and sides until the cake is completely covered. This is called crumb coating and is like a primer coat for your cake. It makes sure that you won’t end up with crumbs all through your final layer of batter. Refrigerate the cake for 20 minutes to firm the crumb coat.
The crumb coated cake.
- While the crumb coat is firming, divide the remaining icing into equal portions. Reserve the white icing for half of the cake. Leaving one half in the mixer bowl, beating on low speed add enough pink food gel until the cake turns a medium-deep pink. It’s hard to get a vivid red with red alone, but starting with a pink base helps. Add enough red food gel until the icing is about as red (or dark pink) as you can reasonably live with. The thing is that the red will deepen over time, so if you stop adding the colouring when it’s the bare minimum it will generally deepen to a point you’re happy with.
- Spread half of the cake with red icing, and the other half with white icing, getting the final coat as smooth as possible. Watch out with this step, as you really don’t want to mix the colours. After you’re finished the red colouring, wash everything – hands, spatulas etc. – and keep plenty of paper towel on hand to wipe away any red. You don’t have to have the red and white halves touching, as they’ll be covered by a strip of black fondant. Reserve any remaining icing.
- Dust a board lightly with icing sugar and roll out the fondant to around 3mm thick. Using a metal ruler cut two strips of black fondant around 2 cm wide and perhaps 20 cm long (long enough to cover halfway along the cake). Lay the two bands along the centre of the cake, dividing the red and white halves. Trim the fondant to meet the cake board flush. Press the fondant into the icing so it sits flush.
- Use a round cookie cutter to cut a circle of black fondant and place it in the centre of the cake. Wash your board and dust again with icing sugar (you don’t want any black fondant on your white fondant when you’re rolling). Roll out a small sheet of white fondant around 3 mm thick and using a smaller round cooking cutter, cut a smaller circle placing it inside the black circle.
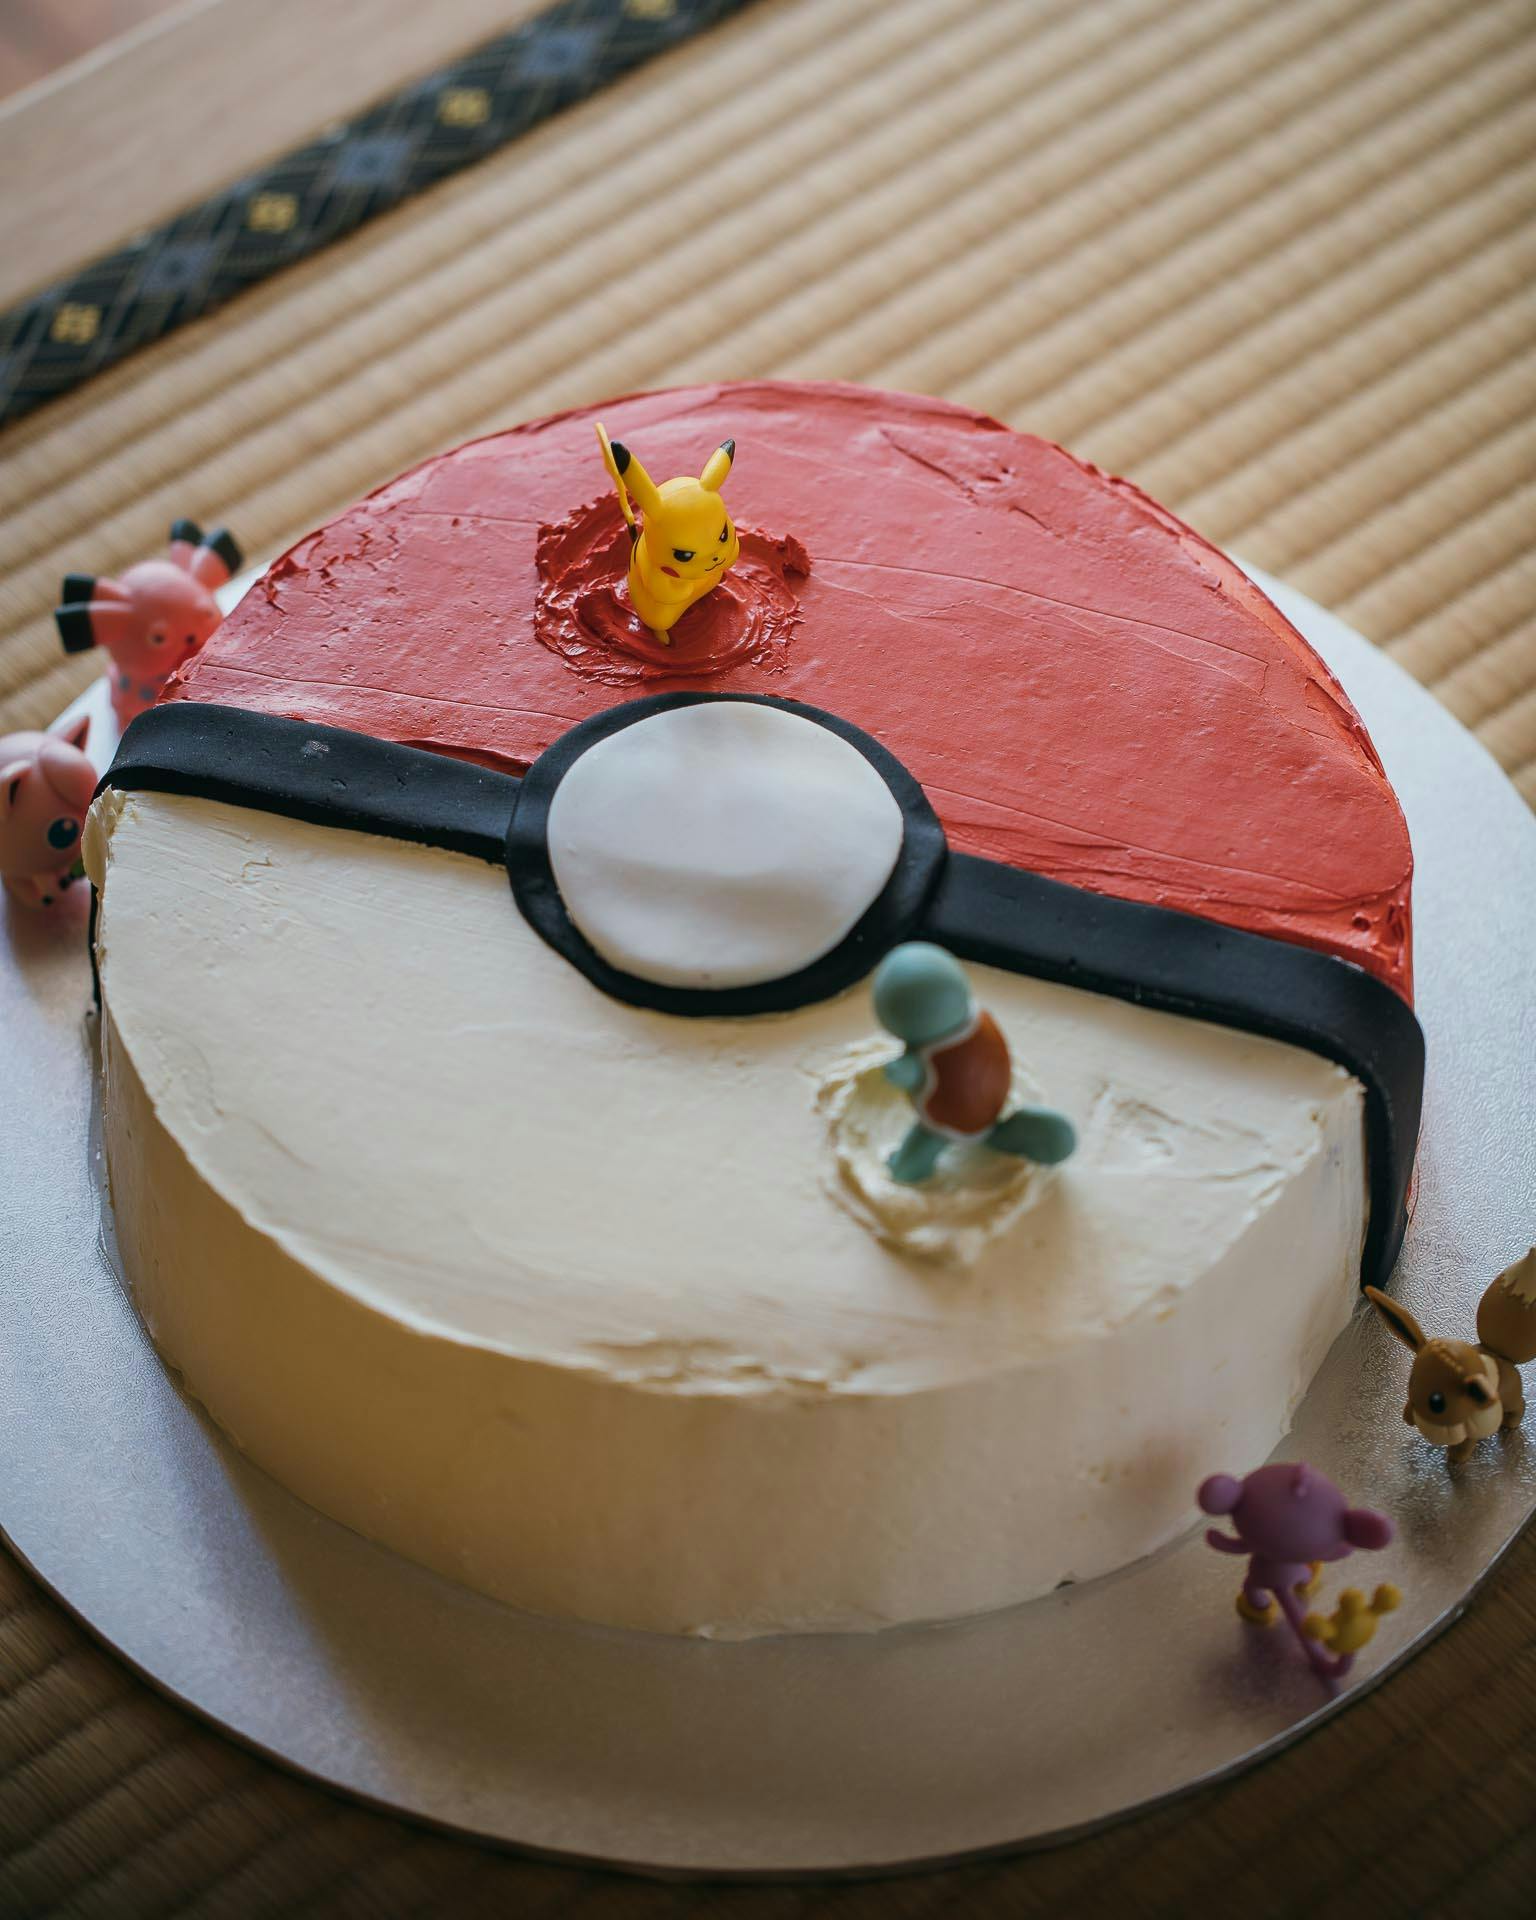
- With your remaining icing, create some small swirls where you plan to place your Pokemon figures. Place the figures on top and you’re done. Keep the cake at room temperature (or around 18C) but do not refrigerate. Please read the tips below, as a lot of them you might find really useful.
Top Tips for Pokeball Cake
- You can keep the cakes wrapped in plastic and foil for 2-3 days, so feel free to make them in advance.
- The cake in the picture was made using a 10-inch tin, but a 9-inch tin would result in a more moist and higher cake so that’s how I’ve written the recipe If using a 10-inch tin each base will cook in around 30 minutes.
- There are PLENTY of cake tutorials for getting flat and moist mud cakes. Watch those if you’re looking for perfection but if you’re not all that interested in using cake wraps, water baths, detailed lining techniques for baking tins etc. then you can get by (like I do) with a simple non-stick tin and not bothering with greasing or lining at all.
- Some cake makers frown on brushing cakes with syrup to keep them moist. I’m not really a cake maker so I couldn’t care less.
- Rather than just placing the toys on top, try to integrate them into the cake. Here I just added a bit of extra icing to create some movement around the characters to give the impression they’re moving and fighting. It makes a big difference. The cake becomes a scene rather than a base.
- Make sure the toys are in character. In this case the Pokemon are fighting so the most important part for placement is that they keep eye contact. If the figures aren’t making eye contact with each other they’ll seem disconnected.
- Pro cake makers would sculpt toppers from fondant or marzipan (and they frown on just buying toys and putting them on top of cakes), but as a parent I think I’d rather my kid had a toy to play with at the end of things rather than eating an entire fondant Pikachu that took me 4 hours to sculpt, so I think it’s better just to buy a toy and whack it on top.
- I’m not sure whether the plastic used for the figures is food grade, but also I absolutely do not care.
Ingredients
Method
When it comes to making cakes I am more “enthusiastic dad” than cake expert. Honestly, this would probably be the first proper iced cake I’ve made in 10 years. My baking is mainly limited to banana bread, and maybe a tea cake, pound cake or cheesecake now and then.
I wouldn’t usually write a recipe for something I’d made just once but I know that because this is on my Instagram people will ask for the recipe and I’m not likely to make another cake like this anytime soon so here’s really just a record of what I did if you’re like me and only bake these kind of things once in a blue moon and want to follow along. This isn’t a perfect recipe. It’s just what I did and I was very happy with the result.
I’m not trying to win any awards here. Just to make one Pokemon-obsessed kid’s day on his birthday. And I think I succeeded.
Ingredients
Salted white chocolate mud cakes (makes 2)
350g unsalted butter, chopped
450 g white chocolate
300 g caster sugar
5 g salt
350 ml milk
3 large eggs
2 teaspoons vanilla extract
525 grams plain flour
3 teaspoons baking powder
Golden sugar syrup
¾ cup sugar
½ cup golden syrup
1 cup water
(or just use 1 cup sugar and 1 cup water)
Italian meringue buttercream
6 egg whites
1 ½ cups caster sugar
450g unsalted butter
1 tsp vanilla extract (optional)
Additional ingredients
black fondant icing (small amount)
white fondant icing (small amount)
violet, pink and red gel food colours
Equipment
9-inch non-stick cake tin
cake scraper
offset spatula
Method
- Weigh a large saucepan and make a note of the weight. Place the butter, white chocolate, sugar, salt and milk in the saucepan and heat over medium heat. Stir to dissolve the sugar and melt the chocolate until the mixture because smooth and silky. This can take about 20 minutes for the chocolate to melt fully. Remove from the heat and allow to cool for 10 minutes. Whisk the eggs and vanilla together and whisk them into the melted chocolate mixture. Sieve the flour into the liquid ingredients and beat to combine using a whisk or spatula. It doesn’t matter if there are a few lumps in the batter. Weigh the saucepan again and subtract the empty weight to find the weight of your batter. Place a 9-inch non-stick springform baking tin on the scales and pour in half the batter (You don’t need to grease the tin if it’s non-stick). Bake at 180C for 45 minutes or until a skewer inserted into the centre of the cake comes our clean. Allow to cool in the tin for 5 minutes and then transfer to a rack to cool. Wash the tin and then repeat for the remaining batter.
- When the cakes are just slightly warm to the touch wrap them in cling film and aluminium foil. Leave overnight but do not refrigerate.
- To make golden sugar syrup combine the ingredients in a small saucepan and bring to a simmer, stirring to dissolve the sugar. If needed, trip any very high domes from the cakes and brush all over with the golden sugar syrup.
- To make the buttercream, wipe the bowl of a stand mixer with a little vinegar on a paper towel and fit it with the whisk attachment. Place the egg whites in the bowl, and place the sugar and water in a small saucepan. Bring the sugar to a boil and continue to heat until the sugar reaches 114C (use a candy thermometer to check the temperature) or 110C if you’re using induction. (The difference here is that you want the sugar to reach 121C just as the egg whites form soft peaks. That will be much faster on induction than gas or electric.) Immediately start whisking the eggs in the stand mixer at high speed. Once the sugar reaches 121C pour the sugar into the whisking eggs an a very slow, steady stream. Walk away and do something else for a while, continuing to whisk the eggs in the stand mixer until touching the metal bowl of the mixer feels cool to the touch. This can take 30-40 minutes. While this is happening, cut the butter into 1cm cubes.
- Stop the mixer and change to the paddle attachment. Beat in the butter a cube at a time until almost all the butter has been added.
- Getting white buttercream. After adding the butter you should see that the buttercream has gone from bright white meringue to a yellow colour. To neutralise the yellow you need to add a little violet or purple food gel. Before you’ve used all the butter, take about 1 matchhead sized amount of food gel with a toothpick and smear it onto a piece of butter. Add the butter and you should see the yellow colour neutralised. If it still looks a little too yellow, add a little more violet gel. You can flavour your buttercream at this point if you like, by adding vanilla or other extracts, or you can just leave it plain.
- Take your cake board and press 3 small pieces of fondant into the base. Place the cakeboard onto a cake turntable, or if you don’t have one a metal pizza tray. Smear a little buttercream over the fondant and place once cake on top (dome up, although there really shouldn’t be much of a dome). Make sure it’s centred and spread a cup of buttercream over the top. Place the other cake on top (dome down). Smooth a thin layer of buttercream all over the cakes with an offset spatula and cake scraper, smoothing the top and sides until the cake is completely covered. This is called crumb coating and is like a primer coat for your cake. It makes sure that you won’t end up with crumbs all through your final layer of batter. Refrigerate the cake for 20 minutes to firm the crumb coat.
The crumb coated cake.
- While the crumb coat is firming, divide the remaining icing into equal portions. Reserve the white icing for half of the cake. Leaving one half in the mixer bowl, beating on low speed add enough pink food gel until the cake turns a medium-deep pink. It’s hard to get a vivid red with red alone, but starting with a pink base helps. Add enough red food gel until the icing is about as red (or dark pink) as you can reasonably live with. The thing is that the red will deepen over time, so if you stop adding the colouring when it’s the bare minimum it will generally deepen to a point you’re happy with.
- Spread half of the cake with red icing, and the other half with white icing, getting the final coat as smooth as possible. Watch out with this step, as you really don’t want to mix the colours. After you’re finished the red colouring, wash everything – hands, spatulas etc. – and keep plenty of paper towel on hand to wipe away any red. You don’t have to have the red and white halves touching, as they’ll be covered by a strip of black fondant. Reserve any remaining icing.
- Dust a board lightly with icing sugar and roll out the fondant to around 3mm thick. Using a metal ruler cut two strips of black fondant around 2 cm wide and perhaps 20 cm long (long enough to cover halfway along the cake). Lay the two bands along the centre of the cake, dividing the red and white halves. Trim the fondant to meet the cake board flush. Press the fondant into the icing so it sits flush.
- Use a round cookie cutter to cut a circle of black fondant and place it in the centre of the cake. Wash your board and dust again with icing sugar (you don’t want any black fondant on your white fondant when you’re rolling). Roll out a small sheet of white fondant around 3 mm thick and using a smaller round cooking cutter, cut a smaller circle placing it inside the black circle.
- With your remaining icing, create some small swirls where you plan to place your Pokemon figures. Place the figures on top and you’re done. Keep the cake at room temperature (or around 18C) but do not refrigerate. Please read the tips below, as a lot of them you might find really useful.
Top Tips for Pokeball Cake
- You can keep the cakes wrapped in plastic and foil for 2-3 days, so feel free to make them in advance.
- The cake in the picture was made using a 10-inch tin, but a 9-inch tin would result in a more moist and higher cake so that’s how I’ve written the recipe If using a 10-inch tin each base will cook in around 30 minutes.
- There are PLENTY of cake tutorials for getting flat and moist mud cakes. Watch those if you’re looking for perfection but if you’re not all that interested in using cake wraps, water baths, detailed lining techniques for baking tins etc. then you can get by (like I do) with a simple non-stick tin and not bothering with greasing or lining at all.
- Some cake makers frown on brushing cakes with syrup to keep them moist. I’m not really a cake maker so I couldn’t care less.
- Rather than just placing the toys on top, try to integrate them into the cake. Here I just added a bit of extra icing to create some movement around the characters to give the impression they’re moving and fighting. It makes a big difference. The cake becomes a scene rather than a base.
- Make sure the toys are in character. In this case the Pokemon are fighting so the most important part for placement is that they keep eye contact. If the figures aren’t making eye contact with each other they’ll seem disconnected.
- Pro cake makers would sculpt toppers from fondant or marzipan (and they frown on just buying toys and putting them on top of cakes), but as a parent I think I’d rather my kid had a toy to play with at the end of things rather than eating an entire fondant Pikachu that took me 4 hours to sculpt, so I think it’s better just to buy a toy and whack it on top.
- I’m not sure whether the plastic used for the figures is food grade, but also I absolutely do not care.
